
Reflective journal
Week 1 – Monday March 13th 2017
In our first lesson on Unit 8 we were introduced to the FMP and we went through what kind of things we were allowed to do for it. We then brainstormed ideas of what makes a good project and explored different ideas to do with the narrative and things that are in the peak district. We also watched some adventure films to give us inspiration and we talked about, as a class, what we liked and disliked about these different films and discussed pacing and how its shots. In our second lesson we didn’t do any work to do with the FMP or Unit 8 as we were catching up with referrals from Unit 7, however, we thought about what we could do for our ideas and started to write things down in our notebooks.
Week 2 – Monday March 20th 2017
I brainstormed ideas and then started work on my proposal. I completed my rationale which was what I had learnt over the course so far and then went on to my Project concept. My project concept contained what my idea for the FMP was. I continued my proposal document and worked on how I would evaluate my work and how I would reflect on the use of my time and how effectively I worked. I also started work on Harvard referencing and getting all my sources into my planning document. I finished off my proposal document and began work on the pitch document, this began by me writing a basic tagline and then started on a synopsis to add to the pitch powerpoint. then I went over my other blog posts that I had to finish. I finished my Brief document and started work on my skills audit. Below is my proposal for you to view.
U8 Project Proposal for FMP Final
Week 3 – Monday March 27th 2017
I added a mood board of scenes I liked to my pitching document along with what music I was planning on using. I also completed my action plan so that I’d know what I was going to be doing over the course of my FMP. Tuesday I went through my pitch and made the alterations that Dom pointed out, this was mostly contextual things and things that needed clarity to make sense. After this, I did a dry run of my pitch so that I was prepared for the pitching the next day. On Wednesday we pitched our ideas and then we voted. My idea didn’t win the vote so isn’t going to be made, I was then made a cinematographer in Juliet’s group. I then started work on researching for my role. On Friday we started to research and I made sure my reflective journal was up to date, I also added all of my documents to blog post 2. We also had our first meeting in which we discussed tone, look and feel of the film. We got our basic instructions of what our director wanted and we began work on researching things that would help transfer the wants of the director to the screen. The meeting was filmed and is below for you to see along with all of the other documents I made for my film that was not voted for.
L3 U8 Project Action Plan and Timetable2
Week 4 – Monday April 3rd 2017
In this session, we talked about how to research effectively and about the different types of research. We also talked about how we would need a range of research to get a good grade on the project, we also knew that if we wanted to make something as best we could then we needed to research the basic skills that we needed. We also realized that we would need to have both primary and secondary research so we can make sure that all of our research is accurate data. I started to include clips from films that have inspired me and wrote about what it was that I was particularly fond of in them. To start off with I only added two film clips which were the beginning of the shining and the end of The Italian Job (Original not remake). I wrote that I had chosen these as they had inspired the proposed ending shot of the film which involved a drone shot above the peak district. I continued with my research and got two books out of the libary which would help me with my research so i had a range of sources. I wanted to focus this sessions research on creating cinematography using the DSLR cameras we had at the college. I also began to complile a list of skills I would need to use in the creation of the film and whether or not I could do these techniques yet or whether or not I would need to practice them. Later on in the session I worked with Lee to create another list of techniques and equipment I should look into using or learning how to use. I began my composition research and started by researching a technique I wasn’t sure of, which was the golden mean. I also researched Depth of field, the rule of thirds and shot sizes so I could be sure I was using the correct shot set up techniques as this would be crucial to getting a good grade and making a good film. I also went over some of the skills I had previously learnt and made sure I was still confident in using them.
Easter Holiday (Week 5/ Week 6)
Over the easter holiday I researched how to expose shots properly in conjunction with the ‘F’ number, focus, shooting landscapes and ND Filters. All this research bar focus was research into skills I didn’t already know or was not confident in using. This meant that I was increasing the amount of techniques I could deploy in the final film which would give it a higher chance of being a good film.
Week 7 – Monday April 24th 2017 / Tuesday April 25th 2017
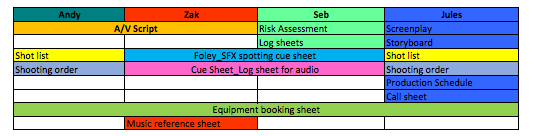
I began work on looking into how to shoot indoors and what equipment we would need to make it look professional. This research spanned two days as I felt it was important to make sure the first scenes of our film, which are indoors, are shot correctly to give our film a good first impression when it comes onto the screen. During these two days my director also divided up the paperwork so we could work through it as a group. This is the diagram of who was to do what.
I began practical research into different camera stabilisation equipment and how I could use them when we were in the peak distrcit and what effects they would have on the overall film. I deemed this nessasary as I thought if the terrain is rough in the peaks I’m going to want to have some form of aid when It comes to filming hand-held. I experimented with a gimbal and with a shoulder rig and in the end the shoulder rig came up top as I felt it was easier to use and better suited to the environment than the gimbal. I began writing up my primary research and what I had learned/ what I was going to use when it came to location experimentation. I also added in some of the pictures I took while up in the peaks district myself as talked about how these pictures captured what I was trying to do in our film with the cinematography. I also wrote up my finding on different types of camera stabilization and why I would rather use a shoulder rig than a gimbal. Then our group sat down to do the AV script which we finished quickly and then started sketching out some plans for our interior sets. I then photographed these and put them in my research blog post and wrote about what each of the drawings meant and what they were meant to symbolise.
Week 8 -Monday May 1st 2017
The week began by our group coming together and talking about what still had to be done planning and paperwork wise. Julliet then showed us where we would be filming and we discussed things like ease of access and what potential hazards would be of these locations and whether or not this had been put into our risk assessment. We then created a rough schedule in which we decided where we should go first and what shots would take priority.
We also started to create a shot list, this was made by both me and my director Juliette and we both had an input in what shots we wanted to get. Due to how things worked when we were planning my director wasn’t avalible for some of the time when I was doing the shot list so I had to do it by myself, this turned out to be okay as I managed to figure out how all of our separate locations were going to fit together.
Me and Zak who is our sound man sat down together and created the AV script with input from Juliette our director and we decided what the shots would be of and what the sounds would be to accompany them. This process was helped by the drawings we had made of our set so we knew what sort of shots we could achieve in the space we had. I thought to open with a very fast paced and quick cut sequence of a cup of tea being made which was influenced by Edgar Wright films like Shaun of the dead. I then thought we should add in a bit of shot diversity and to have the shot open with the camera slowly creeping forwards towards our actors, this could be achieved with a slider without too much hassle so I added in the shot into the script. We decided to only do the AV script for the beginning of the film meaning I could spend our Recce day thinking up good looking shots.
Once this was done I went and did more research on techniques that I thought I would want to use in the peaks. I looked at ND filters and how to shoot outdoors effectively as knowledge of these would greatly help when I was shooting outside in natural light and in potentially difficult conditions. I knew that it was going to be very difficult to get interesting sky in our video without having overexposure so using ND filters would be a great help. Once I’d decided that I wanted to use the ND filters I made sure the director had booked them out, which she had, meaning I could use them in our video.
On the recce day we were dropped off at the surprise view carpark at about 10:00, the weather was slightly overcast but very windy. We decided that firstly we’d go to owler tor and have a scout out for interesting locations that we could include. When we were there I discovered that two rocks had nicely framed the view so I got a shot of that for the reel that my director was going to cut together when we got back. I also experimented with the go pro to do some POV style shots however after viewing the footage I decided it wouldn’t match the quality of the Cannon cameras and therefore wasn’t worth including. I do regret this decision in hindsight as I feel it would have added a little more to the story and would have made our audience feel as though they were in the adventure too. After filming at owler tor we decided to film at surprise view then work our way down to padley gorge, however as we were packing away I realized that the ND filters wouldn’t fit the camera because we didn’t have the right lens, this meant there was no way we could use them in our recce shots. This was a setback as I had planned on learning how to use them practically so when it came to the actual shooting days I would know which ones to use on our camera and not have to experiment quite so much. After this I decided to set up the shoulder rig and try and film shots going over an unstable environment. This was much more difficult that using the shoulder rig in college on hard flat floors and the camera was going all over the place. The most difficult place to use it was on the path up to surprise view itself which is where we had planned to use it, however it turned out to be no more effective than just filming handheld so I made a mental note to not use it in the real filming. When up on surprise view we decided which part of the view we wanted to actually film and I decided doing a pan across the entire view would be an easy solution. There was a problem however that I was quick to bring up to my director, it was that the wind was far too high to fly the drone here like I had planned and we all agreed that the drone wouldn’t fly and even if it could the shot would be shaky from the camera being buffeted around like a stray kite. We quickly scrapped the drone idea of ending the film and decided that we could use the reveal pan as the way to end the film, this seemed like a good compromise although in hindsight I think we really missed out not getting to include that drone shot in our final film and would have made the ending seem more grandeurs.
The next stop for us to go was padley gorge where we also ended up stopping for lunch. Me and my director planned shots we’d like to get such as walking over the rocks and bridges that the gorge offered, I also decided I wanted to get some beauty shots of the water flowing and a small waterfall trickling down. I also experimented with a shot my director wanted which was walking over and away from the camera; we tried this with me on the floor holding the camera and Juliette walking over it. After doing a few takes I pointed out that it might be obvious that the actor is just stepping over the camera and we ended up doing it differently in the final film. After this we went for lunch then headed over to Castleton and discovered a vast chasm that gave me so many good ideas for shots. I liked the landscape as it reminded me of films that I had referred to in my research, namely the hobbit and lord of the ring trilogies as they are both set in new Zealand with truly stunning scenery. I decided I wanted to film something here just because of the scale of it on a whole and I felt it was such a characterful location. Once looking at this location we made the group decision that we had enough footage and were happy to call it a day at this point.
On the Friday we talked about what we had liked and disliked about the locations and equipment and other things. I proposed that we shoot in all the locations we had shot in on the recce day and suggested that we fly the drone in the chasm we scouted rather than up on surprise view. I then said that I didn’t want to use the shoulder rig as it wasn’t going to add anything to our film due to the terrain I would be using it on, I also said we needed to make sure that the lens we took would be able to fit our ND filters on it this time so we could actually use them. I also asked about different lenses and whether or not we could take a few different ones with us to get different types of shots that the standard lens couldn’t get us. Once this had been discussed the director started to create the shot list and shooting order documents, however these were left unfinished and would be completed in the next week.
Below is the video that was edited together from the shots I took on the Recce day.
Week 9 – 8th May 2017
We kept on with our shot list and shooting order to make sure we were prepared for the two shoot days. We also set time aside for when we would be shooting the interior scenes to the video. We then went out and shot our FMP, on the first day I was away shooting another groups FMP at Derwent dam which was useful to me as I was able to see the other groups shooting techniques and it gave me time to think what I would do and what I may change about my own production. While I was there I found out that shots take a lot of time to set up so I knew that I would need to work quickly the following day to get everything done. I also learnt about how some of the equipment we use faired on location and this let me decide if I wanted to use it or not. For instance I found out that reflectors were very useful at getting light on the faces of your characters and that sliders aren’t as good outdoors as there is more uneven terrain. The day after I was involved in the derwent shoot I went to go and film my own FMP. We were dropped off at surprise view and made our way up to the actual view to begin filming, however when we got there we found it to be quite windy so me and my director made an executive decision to forget the drone shot from the video, even though we both knew it would look good, as the drone would not be able to fly in the strong winds. There was some difficulty getting shots done in the high winds as the ground was uneven meaning the tripod was being rocked by the wind in some shots. The high winds also made using reflectors impossible as it would have blown away like a frisbee. We faced difficulties with the background being quite light so we could get the foreground exposed properly, however to combat this we used an ND filter to tone down how white our actors looked. One we’d filmed at the view we worked backwards along the path up to the view and filmed shots of them coming up to the view, this let us have the ending of the film filmed and got before the rest of the shots. This meant that if we started to get behind on our schedule we could use the footage we had as the ending had to not change. Once we had finished shooting at surprise view we moved down to owler tor to film a couple of shots that we had envisioned when we were on our recce day. My director took the helm of these shots as they were mainly handheld and therefore she wanted to get them exactly as she wanted very quickly as we were up against time. Once we had got these shots I suggested we got a shot of our actors going into a cave in the rocks and then we could use that as a transition shot later on to move to a different location. My director decided this was a good idea so I shot it using a handheld technique, I then said we would need to find a cave in castleton where our actors could emerge from. This shot we took turns out to have a continuity error as the actors go into the cave without their bags and emerge with them, this was due to them not having the bags when they were on top of the rocks as that would have impeded their maneuverability up there and could have caused an accident. After we’d finished filming there we headed down to padley gorge and filmed some shots of our actors going across the bridges and stepping stones, these shots proved difficult to get as there turned out to be quite a few children about who would run into shot just as we were about to record who would have to be avoided as we were not allowed to film children. Once these shots had been got we went to castleton and shot using a drone. The drone got us a shot of our principal actors coming out of a cave that we could match up to our earlier shot and then we shot a few more shots around the same location to get shots we hadn’t got earlier. On friday we got all of our footage onto our computers and we started the process of editing together the videos and deleting unusable footage or putting it into a different folder, we then spent the rest of the day updating reflective journals and getting ready to completely edit the film.
Week 10 – May 15th 2017
On Monday we mostly wrote up our reflective journals to make sure I had everything written up from the days we spent out filming in the peak district. We didn’t do anything other than this on Monday as we couldn’t begin the edit on our film as we were doing that on the macs and not on the PCs. In Tuesdays session I started to look into techniques of colour correction for when I did my colour correction later in the week, I’d decided to leave the research on colour correction until the time when I started the edit properly. Wednesday was the same as Tuesday so i made sure that I was completely competent in correction techniques, I also wrote up what I had learnt about ND filters and lenses. On Friday I started to colour grade with what I’d learnt from the research and managed to get it all done. The first scenes of the film were especially difficult to colour grade as they were shot in quite a dark room which mean I had to do a lot of experimenting with the exposure settings to expose it properly in post production.
Week 11 – May 22nd 2017
Firstly I wrote up my reflective journal for the previous week and finished off the colour correction on my video, I then began working on any bits of paper work that were left over that I hadn’t yet done and making sure that I had added all of the planning documents to my blog posts. I made more changes to my research documents so they were better laid out and easier to understand, part of this included seperating my research and planning along with creating one universal bibiliograhy document for the entire project. Another part of this was to add in and reference with quotes all of the sources I had used in the project and make sure that I had included details such as the websites name and what I learnt. I also had to write down why I wanted to learn that and why that would be something I should use in my FMP, for example I would write:I thought in my FMP a drone shot would look good, so using “www.droneshots.com” I was able to research what the best and easiest types of drone shots were. I then decided that the “strafe” would look best as it provided “sweeping, cinematic shots” which I feel would suit the adventure film theme and make the production value of the film look much higher. ”
I thought in my FMP a drone shot would look good, so using “www.droneshots.com” I was able to research what the best and easiest types of drone shots were. I then decided that the “strafe” would look best as it provided “sweeping, cinematic shots” which I feel would suit the adventure film theme and make the production value of the film look much higher.
This will make my research look much more professional as it explains what I wanted, how I found out more about it and why I want it. This would have been easier to do the first time around however I didn’t think to do this so I went back through all my work to add this in. Also while I was doing this I added some more research that I thought would be more useful that some of the other techniques I had mentioned.
Later on in the week I was shown a introduction for our film by my director and she asked my opinion on it. I wasn’t a fan of it and we decided that I would make a new version which would take certain stylistic and editing choices from the director Edgar Wright. This was because personally I am a fan of him and his techniques but also because in an earlier discussion with my group we had decided that we would inlcude something like this.
I also did work on the colour correction and grade of our film, I had foccused mainly before on getting the shots exposed properly so as they did not look to dark that I hadn’t done the exteriour shots. I started work on these and tried to make them all match up to each other as they were shot in various locations and across different times of the day. I spent some time with the basic tools just exposing the video and tweaking the shadows which was giving a much more appealing image. I also started work on the end titles as the ending was no longer the drone shot we had to improvise something else on the day. We had filmed a pan shot which would serve as our ending shot however the pan itself was fairly quick so the end titles went far too fast for anyone to see. To fix this I slowed down the pan and moved the credits so they began off screen and finished off screen rather than beginning off screen and disappearing half was across the screen. I then changed the way my director had laid out the text in the end credits as I didn’t think it looked good and I also changed the font to one that resembled the sign in our video. Then we got onto the subject of music and after much looking for royalty free ones online we hadn’t found anything suitable. This was when we asked Lee to create a piece of music for us to use in our film, he created the one that is in the final version of the film and I feel as though it fits the film nicely and doesn’t take over the visuals.
Week 12 – May 29th 2017
Week off
Week 13 – June 5th 2017
Firstly I went back and corrected my outstanding work that I hadn’t done, like the proposal and earlier planning documents. I went over the project concept and made sure that I had provided evidence of what I had planned and what I would do if my FMP was chosen. I also added the proposal and pitch bibilograhy to the main one for my entire Unit 8 project. Another important thing that we did as an entire class was to watch everyones FMPs and give feedback on
- Overall concept
- Camera work
- Editing
- Sound
This was very useful for us as it provided a few changes we could do to improve our work, as well as this it was also primarily for when we wrote our evaluations so we could write about how other people recived our film. Our feedback said that our film has a nice message but it might not be clear enough at the end what the film is actually about or where the tresure is. These are all things I am going to write up in full in the evalution later in the week.
Me and my director had decided to redo the colour grade as Lee had mentioned how it tended to differ between various scenes, with some being very light and others very dark. He then gave me a quick run through of all of the tools that I could use to change the look of my video, this along with some tutorials from Adobe which I had researched earlier in my project meant that I could fully grade the video. Under this paraghraph, I will include screenshots from the project that show how different the footage looks with a colour grade to it.
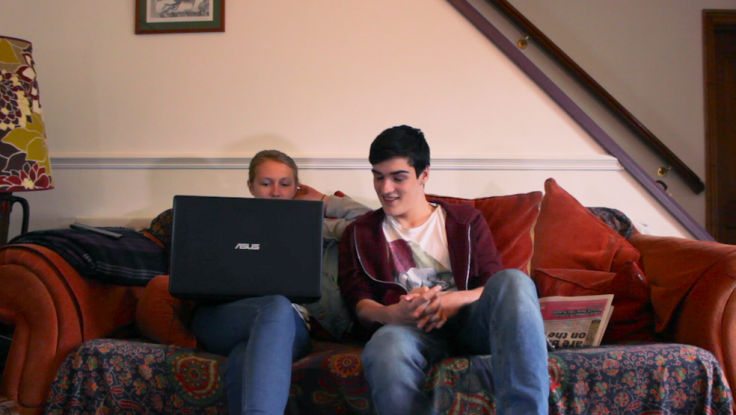
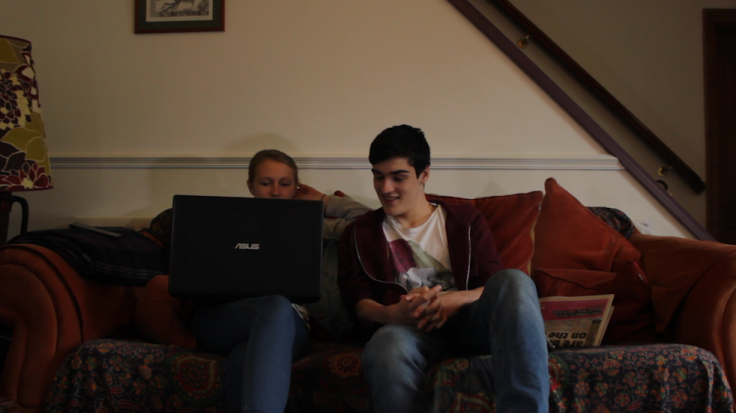
Above is one of the scenes from the interiour sequence with the colour graded version on top and the raw footage at the bottom.
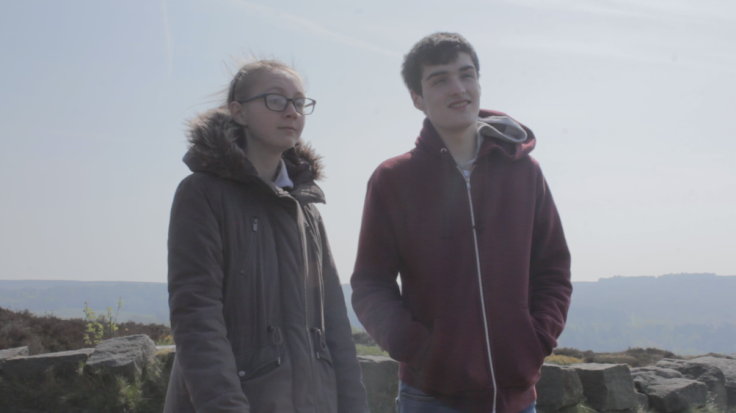

Here is another example of my colour grade work, the above image is the raw camera output and the below image is the colour graded version. You can really see how much colour the grade has brought out and how much more vibrant a shot it now is.
On the friday I spent my day on my evaluation and finishing off things that I hadn’t done yet like adding the final video to my blog post and making sure everything is named correctly. I also then added my planning documents to this reflective journal so as I can prove what I have contributed with and what documents I had a hand in helping to create. Below is the finished product.

Leave a comment